Aspecten
 Download (612 MB)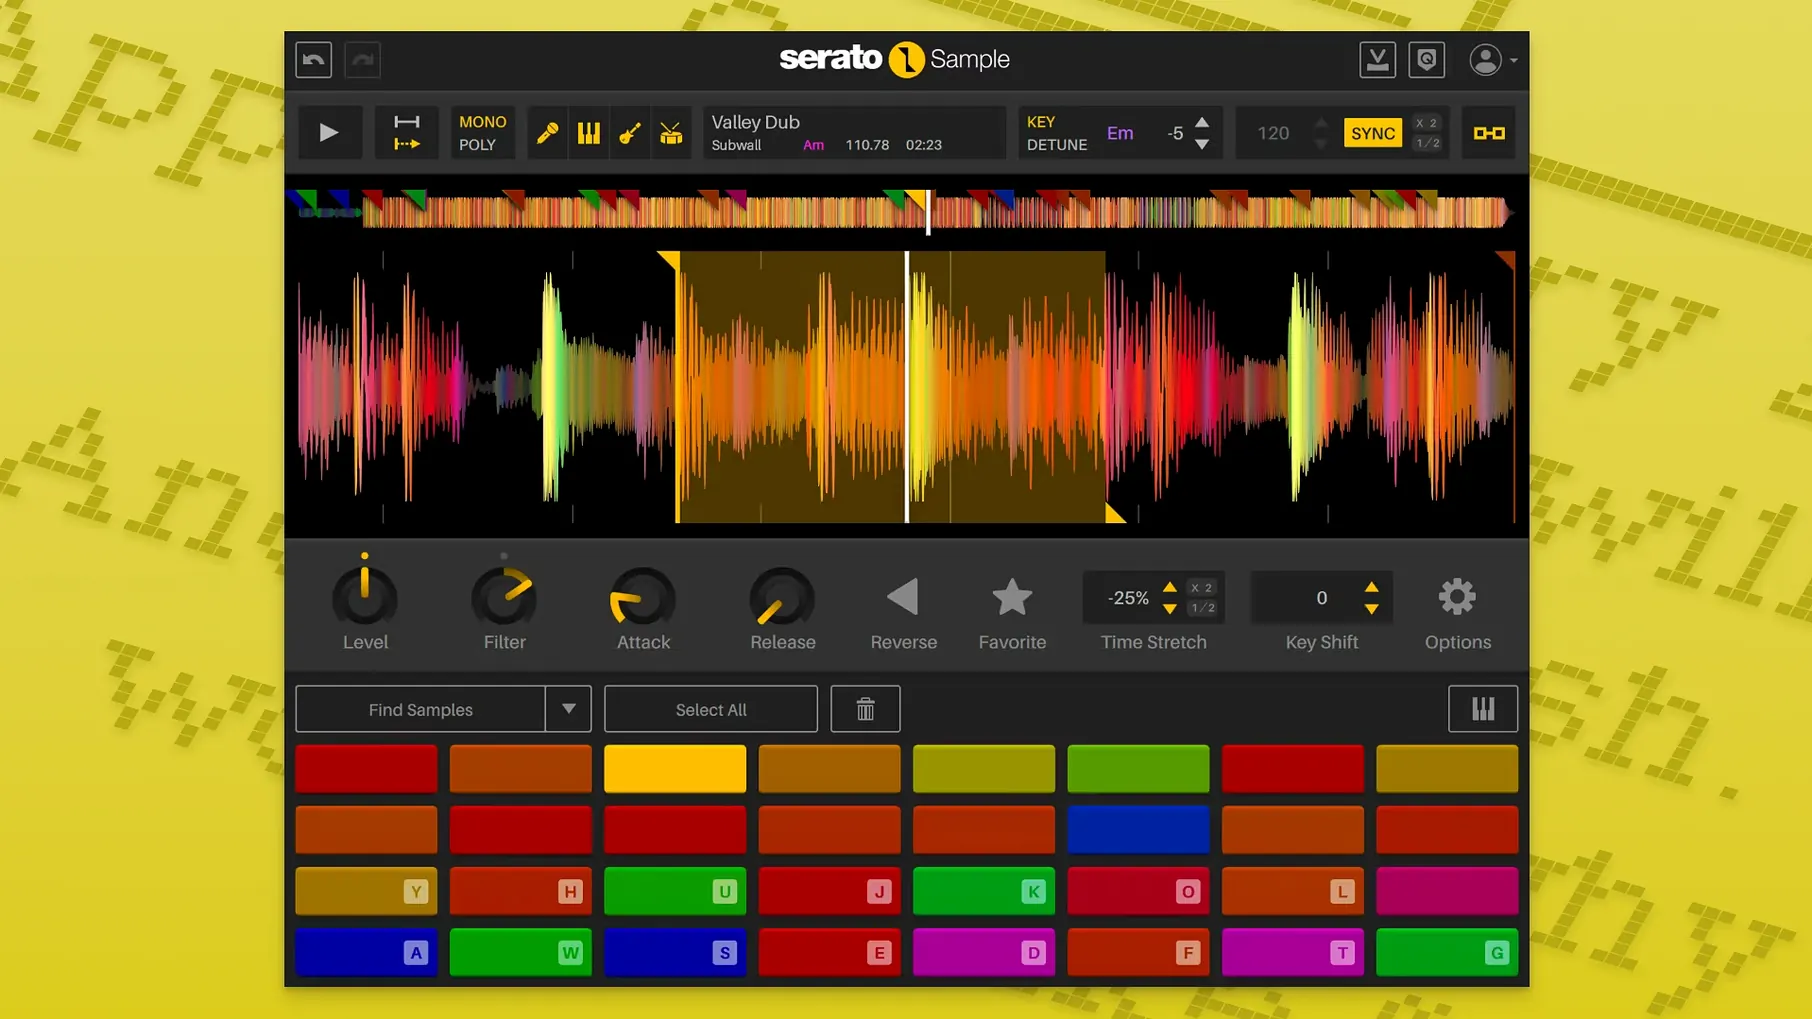
Four stems, one sample. That is the starting point when you load audio into Serato Sample. The plugin can isolate vocals, drums, bass, and melody from a single recording, giving you four independent layers to trigger and manipulate. The process is not a separate prep stage; it happens inside the sampler alongside the usual cue-point and slice workflows.
1. Load and stem-separate
Drag a sample onto a pad. The plugin detects BPM and key and matches them to your project. With one click you can analyse the audio and split it into its four component stems. Each stem appears as a coloured waveform layer you can mute, solo, or level independently.
2. Chop across stems
Slice points are set on the waveform as you would in any sampler, but here a slice can trigger just the vocal stem, just the bass, or a blend. You can assign different stem combinations to different pads, so a kick drum hit and a vocal stab come from the same source file without bleeding into each other.
3. Shape and automate
Pitch-shift and time-stretch controls work per slice. The stem on/off states and stem levels can be automated by the host DAW, which means a vocal stem can fade in over a bar while the drum stem ducks out. Mouse wheel scrolling over parameters makes fine adjustments quick during playback.
The result in a mix is a kind of surgical sampling: you are not just lifting a loop, you are dismantling it and reassembling only the parts that serve the track. A horn line can be pulled from a busy record without the original drums tagging along. A bass groove can sit under a completely different set of chords. The isolation is not flawless on every source material, but when it works the sampler feels less like a playback device and more like an arrangement tool.
It is a plugin, not a standalone app
One question that comes up repeatedly is whether Serato Sample works as a standalone application or only inside a DAW. The answer is straightforward: it is a plugin, not a standalone program. You need a host that supports AU, VST, VST3, or AAX formats. Logic Pro, Ableton Live, FL Studio, Pro Tools, and similar environments all qualify. Once installed, it appears in your plugin list like any other instrument or effect.
Another common query concerns what happens to unsupported audio material. Some assume stem separation only works on clean, modern recordings. In practice, the algorithm handles a wide range of sources: old vinyl rips, live recordings, film dialogue with background music. The results vary. A dusty jazz record from the 1950s can separate surprisingly well, while a dense rock mix from the 1990s might leave faint artefacts in the isolated stems. The plugin does not penalise you for trying on difficult material; it simply produces what it can, and you decide whether the isolated parts are usable.
People also ask whether the plugin introduces latency. Stem separation is a real-time process, so there is a small processing delay when you first analyse a sample. Once the stems are extracted, playback latency is negligible and consistent with what you would expect from any software instrument running inside a DAW. The initial analysis time depends on sample length: a four-bar loop takes a few seconds; a two-minute acapella takes longer.
Keyboard Mode raises its own set of questions. Users unfamiliar with Serato's hardware heritage wonder why a sampler needs a dedicated keyboard mode at all. The reason is that Keyboard Mode remaps the sample chromatically across a MIDI keyboard, with correct pitch and time preservation thanks to the Pitch 'n Time engine. You play the sample as an instrument rather than triggering one-shot slices. The mode works across all four stems simultaneously, so a chord played on your MIDI controller triggers the vocal, melody, bass, and drum layers together, each at the correct pitch.
Over-trusting the automatic beatgrid on unquantised material
A frequent early error is over-trusting the automatic beatgrid. Serato Sample places a grid across the waveform after BPM detection, and that grid governs how slices align to the project tempo. On quantised electronic music the grid is usually accurate. On unquantised live recordings, the detected grid can drift. Beginners sometimes slice immediately without checking whether the transient markers land on actual drum hits. Moving a few markers by hand before chopping prevents rhythmic sloppiness later.
Another mistake is forgetting that stem isolation is not a mixer channel strip. A beginner might load a sample, separate the stems, and immediately mute the drum stem, expecting a perfectly clean instrumental. In many cases the drum stem removal is clean. In others, a faint ghost of the snare remains in the melody stem, or the hi-hat bleed is audible in the vocal layer. The stems are estimates derived from spectral analysis, not discrete multitrack recordings. Treating the stem sliders as rough balance controls rather than absolute on/off switches leads to more realistic expectations.
Beginners also sometimes ignore the host automation parameters. The Stem On and Stem Levels parameters are exposed to the DAW, which means you can draw automation curves for stem mutes and volume. Instead of manually switching stems on and off during a performance, you can programme those changes. A vocal stem that drops out exactly on beat three of bar sixteen, with a smooth fade rather than an abrupt cut, is a two-minute automation task rather than a tricky live manoeuvre.
A subtler error is sample selection based on the wrong criteria. Because stem separation is impressive, newcomers gravitate toward complex, busy recordings to test it. The plugin can handle those, but the most musically useful results often come from simpler sources: a loop with a clear bassline and a defined vocal, a percussion break with a single melodic instrument layered on top. The stems are cleaner, the artefacts fewer, and the resulting slices fit into a mix with less corrective EQ.
Flipping a full song into an airy vocal loop in Ableton Live
Imagine a producer opening a project in Ableton Live at ninety-two beats per minute. The track needs a vocal texture, something airy and loopable, but the sample library contains only full songs. She loads Serato Sample onto a MIDI track and drags a soul recording from the browser onto Pad A1. The waveform appears. The plugin reads the original tempo at eighty-eight BPM and pitches the sample up slightly to match the project. She clicks the stem-separation button and waits four seconds while the analysis runs.
Four coloured layers stack inside the waveform display. She solos the vocal stem and mutes the rest. The voice is isolated but not dry; a trace of reverb from the original recording hangs in the background, which suits the track perfectly. She sets four slice points manually, picking two short phrases and two single words. The slices are assigned to pads A1 through A4. She opens the piano roll and draws a pattern that triggers the slices in a different order from the original song, creating a new melodic phrase that did not exist in the source.
The bass stem from the same sample catches her attention. She unsolos the vocal and brings the bass stem up to audible level, leaving the drums and melody muted. The bassline, freed from the original kick drum, sounds round and isolated. She copies the plugin instance to a second track, loads the same sample again, and this time keeps only the bass stem active. The two tracks now run independently: one for vocal slices, one for a bass loop. She nudges the bass track's slice points to loop a two-bar section and lets it run underneath the vocal pattern.
With the arrangement taking shape, she opens the automation lane for Stem Levels. The vocal stem volume gets a gradual rise over the intro, and the bass stem dips during a breakdown. The automation curves appear as smooth lines in the DAW, and she tweaks them with the mouse wheel while playback continues. The whole process from sample import to a working arrangement with automated stem movements takes under fifteen minutes.
Waves CR8 is a deep workstation while Serato Sample focuses on slicing
Serato Sample sits in a category occupied by a few other sampling instruments, each with a different emphasis. Three comparisons help place it.
Serato Sample and Waves CR8 Creative Sampler. Waves CR8 is a deep sampling workstation with layering, modulation, and a large built-in effects section. It can do multisampling and complex sound design in ways Serato Sample does not attempt. Where Serato Sample pulls ahead is stem isolation: CR8 has none. If your workflow depends on extracting vocals or basslines from finished records, Serato Sample offers a capability that CR8 simply lacks. CR8 excels at building playable instruments from clean source material; Serato Sample excels at dismantling dense recordings into usable fragments.
Serato Sample and Ableton Simpler. Simpler comes bundled with Ableton Live and covers traditional slicing, warping, and one-shot playback. The warping engine is capable, and the integration with Live's browser and Push controller is tight. Simpler does not separate stems. It also does not use the Pitch 'n Time algorithm for independent pitch and tempo manipulation. Serato Sample's time-stretching is audibly cleaner at extreme settings, and the four-stem architecture means you can treat a single sample as four independent sound sources. A Simpler user who needs only basic slicing and pitch adjustment is well served by the stock device. A producer who regularly extracts drum grooves from records and plays them alongside isolated vocal phrases will find Serato Sample a more direct tool.
Serato Sample and iZotope RX as a sampling front-end. RX is an audio repair suite with powerful source-separation modules. Technically, you can separate stems in RX, export the files, and load them into any sampler. The separation quality in RX is excellent. The workflow, however, is offline and multi-step: open RX, run the separation, export four audio files, import them into a sampler, and map them. Serato Sample collapses that into a single drag-and-drop action inside the DAW. For a producer who needs to audition stem combinations quickly and change slice points on the fly, the integrated approach saves significant time. RX remains a better tool for forensic cleanup, but as a real-time creative sampler, Serato Sample's immediacy is hard to match.
Sending each instance through your DAW's built-in effects
Serato Sample integrates with a DAW's existing routing and automation systems, which opens up a number of useful combinations. The most immediate pairing is with a DAW's built-in effects. Since each instance of the plugin outputs audio through its host track, you can place an EQ after Serato Sample to clean up stem artefacts. A high-pass filter on the vocal stem output removes low-frequency rumble left over from the separation process. A compressor after a bass-only instance tightens the dynamics of an isolated bassline. The plugin does not need to contain its own effects because the DAW supplies them.
MIDI controller workflows benefit from Keyboard Mode's chromatic mapping. A producer with a hardware synthesiser or a general-purpose MIDI keyboard can play the stems as a polyphonic instrument. The Pitch 'n Time engine ensures that a C3 on the keyboard triggers the sample at its original pitch, while an F3 retunes it with correct timing. This works particularly well with melodic stems: a short vocal phrase becomes a playable lead sound, and a bass stem becomes a pitched bass instrument that tracks across octaves.
macOS features contribute in quieter ways. The Audio Unit plugin format allows Serato Sample to work inside Logic Pro's native environment without a wrapper, and AU validation ensures the plugin is recognised reliably after installation. Apple Silicon support means the plugin runs natively on M-series chips, so stem separation and time-stretching execute efficiently without Rosetta overhead. The disk image installation process is standard for macOS: open the downloaded file, run the installer, and the plugin files land in the correct system folders for AU, VST, VST3, and AAX hosts.
Another practical combination is with a DAW's sampler or drum rack. A producer might load a loop into Serato Sample, isolate the drum stem, and resample the output into a drum rack's individual pads for further processing. The Serato instance acts as a stem extraction front-end, and the resulting one-shots get layered with other drum samples in the rack. This turns the plugin into a source-material generator as well as a performance sampler.
For users who rely on serato sample for mac in a live performance setup, the stem automation parameters become a performance tool. A MIDI controller with assignable knobs can map to Stem Levels, allowing real-time fades of the vocal, melody, bass, and drum layers during a set. Combined with a DAW's scene-launching or clip-triggering features, this creates a live remixing environment where a single sample can shift between a full arrangement and a stripped-down loop without loading new audio files.