Aspecten
 Download (1.6 GB)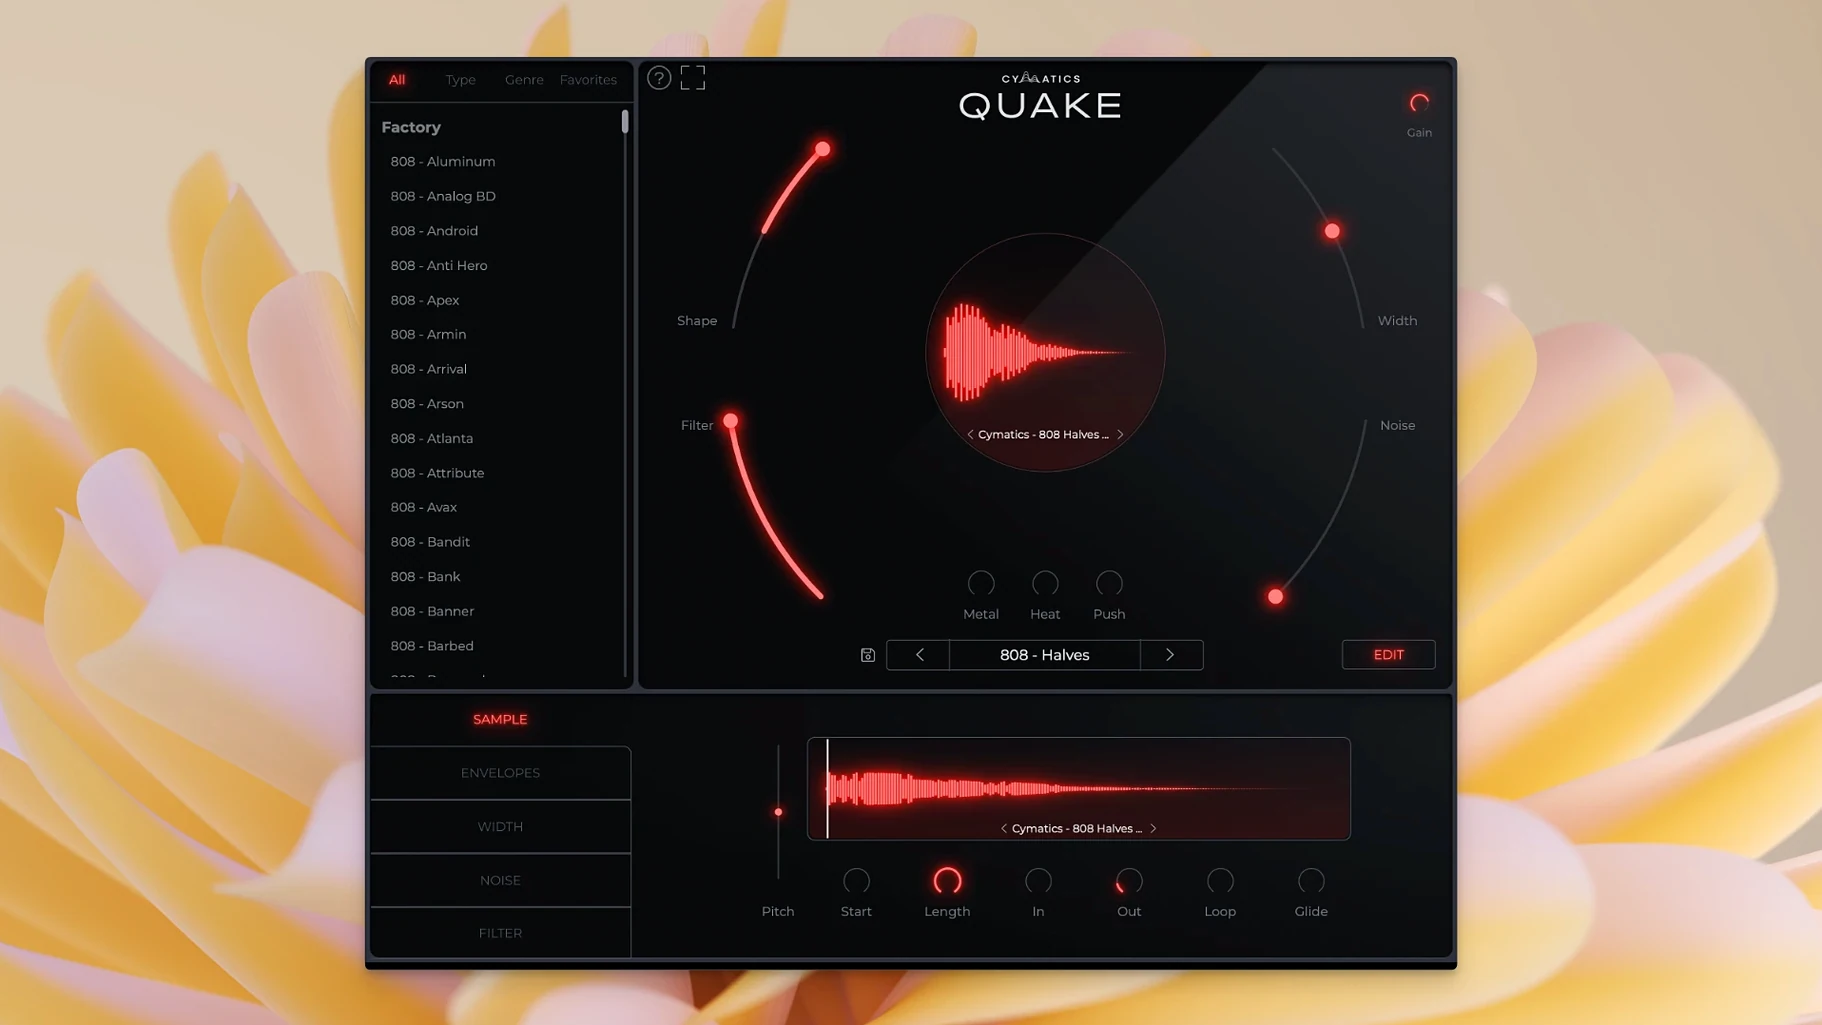
A bass part often stalls before it starts—too many tools open, too much flicking between windows. QUAKE puts the core shaping of a bass or 808 sound inside a single view, so the signal moves from preset to finished tone without leaving the plugin.
Pick a preset, then reshape it
The factory library covers Trap, House, R&B, EDM, Drill and several others. Any preset is fully editable, so a starting point can be pulled in a different direction by changing the Shape control, which adjusts tone and envelope together.
Clean the low end with the filter
Unwanted frequencies sit below or around the note and muddy a mix quickly. The built-in filter cuts what the bass does not need, keeping the weight of the sound without the rumble that fights the kick.
Add grit through the noise section
Dialling in analogue noise and texture gives a cleaner digital bass some roughness. The Noise control sits alongside Shape and Filter, so the three work as a chain—tone, cleanup, texture—inside one window.
Stereo width that keeps the sub in focus
Open an instance of QUAKE and a default patch loads. The first thing to check is the Width control. Bass sounds in mono stay focused; a little stereo spread can push a pad-like bass wider, but anything above 30% often weakens the centre. For 808 work, pull Width to zero and leave it there. The sub frequencies need to sit dead centre in a mix.
Next, visit the Filter section. The default cutoff sits open, which can let through low-end information that interferes with a kick drum. A gentle high-pass around 30–40 Hz cleans the sub without thinning the body. The slope matters more than the number—steeper cuts ring less on sustained 808 notes.
The Noise knob defaults to off. Bringing it up even 5–10% adds analogue hiss that makes a bass cut through laptop speakers and phone playback. The texture stays subtle at low values but becomes a creative tool past the halfway point.
Finally, the saturation trio—Metal, Heat, and Push—all start at zero. Adding one at a time avoids the muddy stacking that happens when all three run together. A common approach: Heat for warmth on an R&B bass, Metal for edge on a Drill 808, Push for a midrange growl that reads on small speakers.
A workflow for designing a Trap 808, start to finish
Open QUAKE on an instrument track in a DAW. The goal is an 808 that punches on a phone speaker and still rattles a car door. Start with the library browser, open the Trap category, and load a preset labelled with a short, clean tail—something that hits and decays rather than sustains.
Pull Width to zero. Trap 808s live in mono. The kick and the 808 often trigger together, and any stereo information on the sub end muddies the phantom centre.
Now shape the transient. The Shape control adjusts both tone and envelope, so a small clockwise turn shortens the attack and adds a click at the front of the sound. Find the point where the click feels like a finger snap, not a tick. Back off slightly once you have it.
Engage the Filter and sweep the cutoff down from 200 Hz until the tail loses some boxy resonance—often around 80–90 Hz, depending on the preset. A 12 dB/octave slope works here; anything steeper can make the decay feel unnatural.
Add Noise to about 8%. The hiss sits on top of the sub and gives the 808 a presence that survives data compression. Now bring Metal up to 15% for a cold, brittle edge that mimics the sound of a distorted 808 run through a hardware sampler. The combination of Noise and Metal makes the preset sound less like a clean sine wave and more like a finished record.
Play a C note at the velocity the beat demands. The 808 should feel tight, with the click arriving first and the body following. If the sustain overpowers, pull the Shape control back a hair—it tightens both tone and envelope in one move. Save the preset with a name that describes the key and character, for quick recall later.
Giving a bass line midrange for phones and laptops
One of the first issues people hit is a bass sound that disappears on small speakers. The sub is there, but the midrange information needed for phones and laptops is missing. The fix is almost always a combination of Push and Noise. Push adds saturation in the midrange; Noise supplies the high-frequency texture. Together they create harmonics that make the bass audible without boosting the sub.
Another snag: the plugin feels sluggish when switching presets during playback. QUAKE loads samples and convolution impulses, so rapid preset browsing can cause dropouts. The workaround is to pause playback, load the preset, and hit play again. The engine settles quickly once the sound is loaded.
A third point of friction is phase cancellation when layering QUAKE with a kick sample. The Width control, if set above zero on a sub preset, introduces subtle stereo processing that can shift phase. Keeping Width at zero for any sound below 100 Hz avoids the problem entirely. For basses that genuinely need width, apply it higher up—use a separate instance for the mid bass and keep the sub layer mono.
Some presets hit the output too hot, especially those with Heat and Push already dialled in. The plugin has no output trim on the front panel, so the DAW channel fader needs attention. Lowering the channel by 6 dB before adding further processing prevents clipping further down the chain.
Finally, the Shape control can confuse at first because it affects two things at once. Treat it as a macro that moves tone and envelope in tandem. For fine control, adjust it in small increments—a quarter turn can shift the entire character of a preset.
Building a bass part under a finished beat
The beat is already laid out: kick, clap, hi-hats, and a simple chord loop. The low end needs a bass part that sits under the kick without fighting it. Open QUAKE on a fresh instrument track and name the track "Sub Bass".
Browse to the House category and audition a few presets with the DAW looping an 8-bar section. One preset has a rounded attack and a short decay—it sounds like a low tom. That works. Load it and set Width to zero. The kick is already mono, so the bass must match.
The chord loop plays in A minor, so the bass progression follows A, C, G, F. Play the notes in on a MIDI keyboard, keeping the velocity consistent. The preset's envelope does the shaping; the performance just needs to be in time. Quantise lightly—tight but not robotic.
Now the kick and bass overlap. The low end rumbles on the G note, which fights the kick's tail. Open the Filter and set a high-pass at 35 Hz with a 12 dB/octave slope. The rumble drops away, leaving the kick's fundamental clearer. The bass still feels heavy, just cleaner.
The track needs the bass to push through the mix, not just sit under it. Add 10% Heat for analogue-style saturation. The midrange fills out slightly. Then add 5% Noise—just enough that the bass has a breathy texture on top. On laptop speakers, the note is now audible as a presence, even though the fundamental is gone.
One more tweak: the A note rings slightly longer than the others, masking the start of the next chord change. Turn the Shape control counter-clockwise a few degrees. The decay shortens across all notes, and the envelope tightens. The bass now pumps with the beat rather than smearing across it.
Save the preset as "House Sub A minor". The whole process—from opening QUAKE to saving—took under five minutes. The plugin kept every adjustment in one window, so there was no clicking to a separate EQ, a separate saturator, a separate stereo tool. The DAW session stays tidy.
Running QUAKE on an older Intel or Apple Silicon Mac
A common question is whether QUAKE works on older Macs. The plugin runs on macOS 10.14 and later, and supports both Intel and Apple Silicon processors natively. A machine that handles other virtual instruments without crackling should run QUAKE fine, though heavy saturation settings can increase CPU load slightly. Bouncing to audio once the part is written keeps the session running smoothly on any system.
Another question is whether the plugin comes with enough sounds to justify the space it takes. The preset library spans thirteen genres, and every preset can be pushed well beyond its initial character through the front-panel controls. A single preset becomes several different basses depending on how Shape, Noise, and the saturation trio are set. The library is a starting point, not a fixed collection.
Producers also ask if QUAKE replaces their existing bass plugins. It sits alongside them rather than replacing them outright. The value is the speed of the single-window workflow—no chaining three plugins for sub, saturation, and stereo width. For sound design sessions where the goal is a finished bass in minutes, QUAKE covers the chain. For surgical work, a dedicated EQ or multiband processor still has a place in the signal path after QUAKE.
People searching for a quake bass vst often wonder about the install process. The plugin follows the standard procedure for the format, and once loaded, it appears in the instrument list of any compatible DAW. No separate authorisation tool runs in the background.
Some ask whether QUAKE works well with samples from other sources. The plugin processes its own engine, so external samples are not loaded into it. But it layers effectively with sampled 808s on separate tracks—one instance provides a clean, shaped sub, while a sampled 808 handles the top-end knock. The two together create a hybrid bass that uses the best of both.