Aspecten
 Download (57 MB)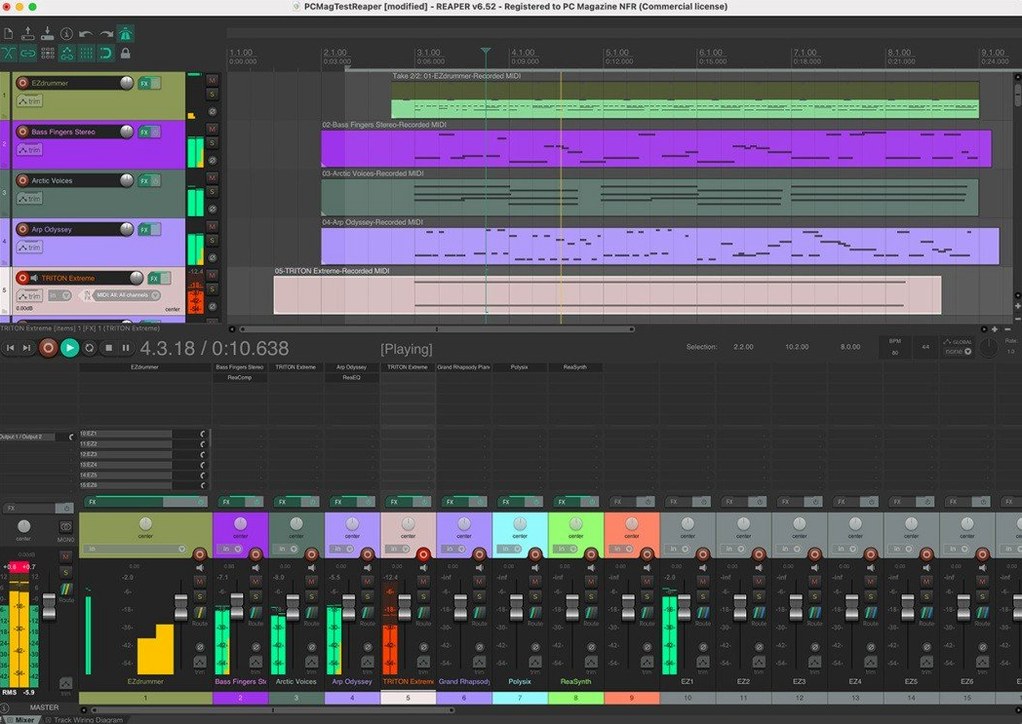
Anyone familiar with the immediacy of a tape machine or a simple portastudio will find the basic tracking workflow in REAPER remarkably direct. You insert a track, arm it, and record. But once you move past that surface, it becomes a different kind of tool: one where almost every signal path and interface element can be reshaped to fit a specific way of working.
| Aspect | Detail |
|---|---|
| Audio I/O | Up to 512 channels hardware, 512 loopback |
| MIDI devices | Up to 128 output hardware and loopback |
| Channel mapping | Fully remappable |
The channel counts alone tell part of the story. Supporting up to 512 remappable audio inputs and outputs, plus a further 512 channels of loopback audio, places REAPER in a category suited to complex routing matrices and multichannel audio work. The 128 MIDI output devices extend that logic to hardware synths and outboard sequencing. What makes these figures practical is the track folder system: routing audio from child tracks into a folder is automatic, which keeps large session templates manageable without constant manual bussing.
Beneath the mixing and editing surface lies a scripting engine that lets you alter the application itself. Actions can be chained, custom toolbars built, and the entire interface rearranged. For someone maintaining a consistent post-production or composition setup across macOS versions—from 10.15 through to the latest ARM64 builds—this means the DAW can adapt to an established routine rather than demanding the reverse.
Naming tracks before touching a fader
A songwriter sits down with an acoustic guitar, a small two-input interface, and a rough idea that came together the night before. She opens REAPER, creates three tracks, and names them before touching a single fader. The first track gets a condenser mic for the guitar body. The second takes a dynamic mic near the twelfth fret. The third stays empty, waiting for a vocal take later in the afternoon.
She records four minutes of fingerpicking in one pass, then immediately drags the take into a folder track she labels "Guitar Bus." A second folder holds a room reverb on its own child track, fed by a send from the guitar bus. Within twenty minutes she has a printed stereo rough mix she can email to a collaborator. No track limits stopped her from adding a scratch piano line when the idea shifted. The routing stayed visible in the mixer panel, and the folder structure meant she never lost sight of which elements belonged together. For someone who thinks in song sections rather than signal graphs, the session grew sideways—adding possibilities without burying the core performance.
The missing step is nearly always input monitoring
A new user often treats REAPER like a console with fixed channel strips. They insert a track, load an instrument, and then wonder why the MIDI keyboard produces no sound. The missing step is nearly always input monitoring. REAPER leaves monitoring off by default on new tracks; clicking the small speaker icon to cycle through monitoring modes solves it instantly, but the icon is easy to overlook when you are still learning where things live.
Another common stumble involves the difference between trimming an item edge and moving its contents. Grabbing the edge of a media item shortens it non-destructively, while holding a modifier and dragging slides the audio within the same item boundaries. Beginners who do not yet know the modifier split clips unnecessarily, then struggle to align them later. A few minutes spent right-clicking an item and studying the item processing menu clears up most of the confusion.
Track folders cause their own misunderstandings. Dragging one track above another does not make it a folder; the folder button on the parent track must be engaged. People new to the DAW sometimes stack tracks, enable the folder icon only on the top one, and then wonder why the routing sounds wrong when they bypass the parent. The fix is simple—check that the last child track has its own folder button set to "last track in folder"—but the logic only becomes second nature after a few sessions.
Bind key commands for monitoring on day one
Before recording anything serious, open the Action List and search for "monitoring." Bind a key command to "Track: Set track record monitor to on" and another to "Track: Set track record monitor to off." Having these under your fingers removes the most common friction point when you are moving fast between tracking and playback.
Spend fifteen minutes building a template track layout. Create four or five named tracks, group them into a folder, add a reverb on a send, and save the project as a template via the File menu. The next time you open REAPER, you can load that template instead of starting from an empty session. Even a rough template eliminates repetitive setup and lets you capture ideas before they fade.
Right-click the transport bar and customise it to show only the controls you use. The default transport includes buttons many home recordists never touch; removing them reduces visual noise. In the same session, visit Preferences, find the Audio section, and tick "Close audio device when stopped and application is inactive." This setting frees your audio interface for other applications when REAPER is idle—useful when you are switching between the DAW and a reference track in a browser.
Finally, download a few user-made colour themes from the REAPER stash. The default theme works, but finding a visual layout that suits your screen size and lighting conditions makes long editing sessions noticeably easier on the eyes. You can switch themes from the Options menu without restarting.
Runs on macOS 10.15 and loads quickly on modest machines
Will it run on an older Mac I keep around for recording? REAPER supports macOS from 10.15 onward on both Intel and Apple Silicon hardware. The installer itself is small, and the application loads quickly even on machines with modest RAM. People who maintain a dedicated studio computer often report that REAPER remains responsive on hardware they would hesitate to use with heavier production suites.
Does it work with the plugins I already own? AU, VST2, and VST3 formats are all supported. If your plugin collection spans several developers and installation methods, REAPER scans them without vendor-specific restrictions. The bridging architecture handles 32-bit and 64-bit plugins on compatible systems, so older effects do not become unusable after an update.
Can I try the full version without committing? The uncrippled evaluation period lasts 60 days, after which the software continues to function without locking features. Nothing is withheld during evaluation: all channel counts, scripting, rendering, and plugin support remain available. This means you can complete real projects before deciding whether REAPER fits your workflow.
Increase media buffer size for large sample libraries
Open Preferences and navigate to Audio > Buffering. Increase the media buffer size to 1200 milliseconds if you work with large sample libraries or stream audio from a mechanical hard drive. The default value suits general use, but a larger buffer smooths playback when disk access becomes a bottleneck during dense arrangements.
Under Appearance > Track Control Panels, enable "Show dB scales on track meters." The default meters display level without a numerical reference; turning on the scale gives you precise peak and RMS information at a glance, which helps when gain-staging across a mix.
In the Editing Behavior section, change "Move edit cursor to start of selected items" to off. When this setting remains on, clicking an item moves the playback cursor, which can disrupt a comping session where you want to select and audition without relocating the timeline. Disabling it keeps selection and playback position independent.
Under Project > Track/Send Defaults, set "Record config" to "time selection auto-punch." If you regularly record multiple takes of a section, loop-based punch-in becomes the default for every new track you create. You can still override it per track, but having it as the project default saves repeated right-click trips to the record mode menu.