Aspecten
 Download (24 MB)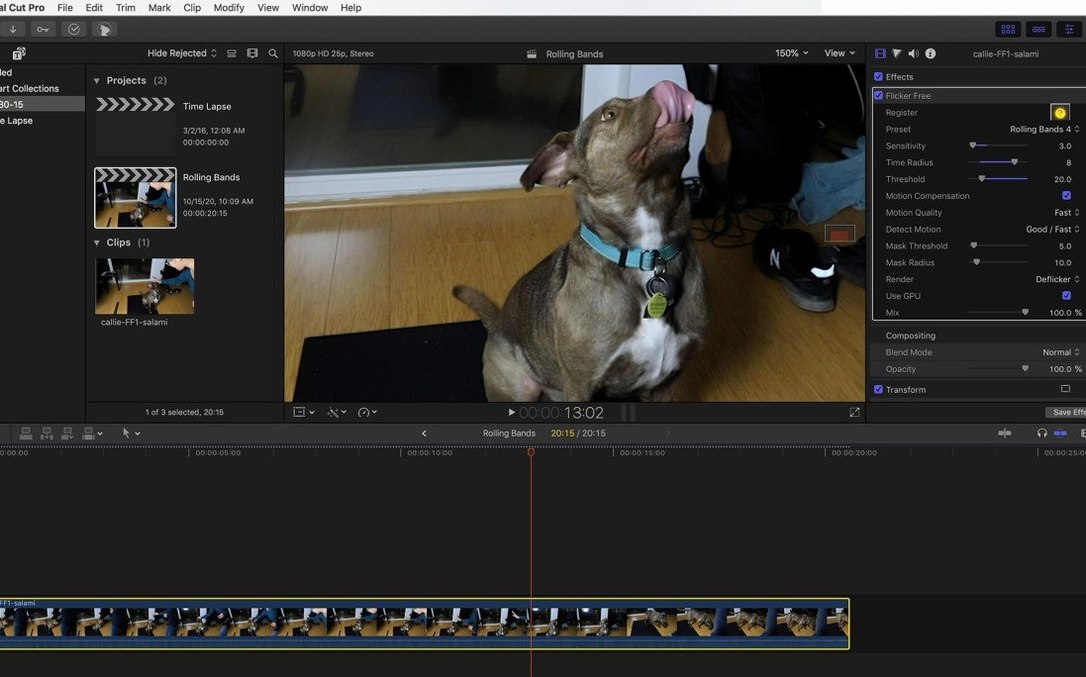
Flicker Free is a video plugin from Digital Anarchy that analyses frames during processing to remove flicker from footage. It targets problems caused by time-lapse shooting, high-frame-rate recording and rolling bands from LED or fluorescent lamps, working as a third-party effect inside several host editors.
Hosts, formats and compatibility
The plugin functions within Final Cut Pro, After Effects, Premiere Pro, Avid Media Composer and DaVinci Resolve, alongside other OpenFX-compatible applications. That spread means it fits into a range of established post-production pipelines rather than tying you to a single editor. Because the processing is handled inside the host, the output format is whatever your timeline delivers — no intermediate renders or standalone conversions are required. The interface language is English, and version 2.1.6 runs on both Intel and Apple Silicon Macs.
How the processing sounds in practice
The plugin analyses frames as they pass through the effect, comparing adjacent images to smooth out luminance and colour shifts that cause visible pulsing. A set of presets simplifies the initial setup: you pick the scenario that matches your footage — time-lapse, slow motion, fluorescent light or LED flicker — and the analysis adjusts accordingly. In use, this means a clip shot under cheap gym lighting or a night-time construction time-lapse can be steadied without manually keyframing exposure corrections. The frame analysis works on the fly inside the host, so you hear the fans spin up on longer clips, but the result is a sequence where the distracting flutter is pulled back to something the eye accepts as stable.
Flattening exposure jumps in dawn-to-dusk time-lapse
Editors working with time-lapse sequences tend to get the most value from Flicker Free. A landscape photographer capturing dawn-to-dusk transitions inevitably wrestles with subtle exposure jumps between frames; the plugin flattens those into a smooth gradient without requiring frame-by-frame keyframing. Documentary editors dealing with uncontrolled lighting in interviews or vérité footage — conference halls, gymnasiums, factory floors — also find it useful, because rolling bands from fluorescent tubes or cheap LED panels are common in those environments and hard to anticipate on location.
High-frame-rate shooters using cameras that push past 120 fps encounter a different class of flicker, often tied to the interaction between shutter speed and mains frequency. Flicker Free handles that scenario without forcing you to conform the footage to a standard frame rate first. Motion graphics artists who composite screen replacements or integrate monitor footage similarly benefit: the plugin can stabilise the rolling refresh artefacts that appear when filming computer displays, saving time compared to manually painting out bands or adjusting shutter angles in post.
Smoothing stroboscopic flutter across a dusk skyline
Picture a Premiere Pro timeline with a two-minute time-lapse of a city skyline at dusk. The clip plays back with a rapid, almost stroboscopic flutter across the sky — the camera’s auto-exposure reacting inconsistently as office lights flicker on.
You drag the Flicker Free effect onto the clip. The effect controls open in the Effect Controls panel. Rather than start from scratch, you open the preset dropdown and select Time Lapse. The plugin immediately recalibrates its internal frame-analysis parameters. You set the work area to a ten-second representative section — one that includes both the brightest and darkest moments — and trigger a short render. Premiere chugs through the frames; the progress bar crawls, but a minute later the preview loop plays back with the flutter noticeably dampened.
Satisfied that the preset is close, you add a small manual adjustment to the flicker sensitivity slider, dragging it left just enough to preserve the natural light decay on one office tower. A second short render confirms the balance holds. You then clear the work area and let the full timeline render overnight. By morning, the skyline drifts from afternoon to night with only the intended light changes visible.
Why timeline scrubbing stutters before rendering
Flicker Free is not a real-time effect. Even on Apple Silicon hardware, the frame analysis is computationally heavy, and you feel that in scrubbing responsiveness — the timeline playback stutters when the effect is active and unrendered. The sensible workflow is to apply it, test a short section, then render and disable the effect for further editing. On an M1 Max machine, a ten-second 4K time-lapse clip took roughly ninety seconds to render the initial analysis pass; longer sequences scale linearly with frame count rather than clip complexity.
Stability in daily use is solid. The plugin loads reliably across After Effects 2024, Premiere Pro 2024 and DaVinci Resolve 18, and it has not caused unexpected host crashes in daily testing with moderate effect stacks. Memory usage stays within sensible bounds — it does not balloon during long renders or leave orphaned processes when you close the host. The one practical limit is that stacking multiple instances on the same clip, while possible, multiplies render time quickly and rarely yields better results than a single well-tuned pass.
A time-lapse deflicker workflow from start to finish
Consider a sequence shot on a GoPro HERO3 Black during a road trip: three thousand stills assembled into a 25 fps clip showing a ferry crossing at sunset. The interior lighting on the ferry flickers at a frequency the camera could not synchronise with, and the sky exposure pulses as clouds pass.
Step one: import and place. The stills are imported as an image sequence into After Effects and placed in a composition. Playback confirms two overlapping flicker problems: a fast interior pulse and a slower sky flutter.
Step two: apply and categorise. Flicker Free is applied to the layer. The preset is set to Time Lapse, which tells the plugin to look for frame-to-frame luminance shifts typical of stills assembled into video. The effect panel displays the analysis mode and sensitivity defaults.
Step three: sample segment testing. A work area of five seconds is set over a section where both interior and exterior flicker are visible. A RAM preview is rendered. The interior pulse is gone, but the sky retains a faint undulation. The sensitivity is increased slightly, and a second RAM preview confirms both problems are resolved without flattening the natural sunset colour shift.
Step four: full render and review. The composition is added to the render queue. The output module is set to ProRes 422 HQ. The full clip renders in just under forty minutes. On review, the ferry interior glows steadily, the sky transitions smoothly, and no residual artefacts are visible at scene cuts or in the water reflections.
Step five: archive the preset. The adjusted sensitivity value is saved as a new preset named Ferry Sunset for reuse on similar time-lapse sequences, cutting setup time on future projects that share the same camera and lighting conditions.