Aspecten
 Download (75 MB)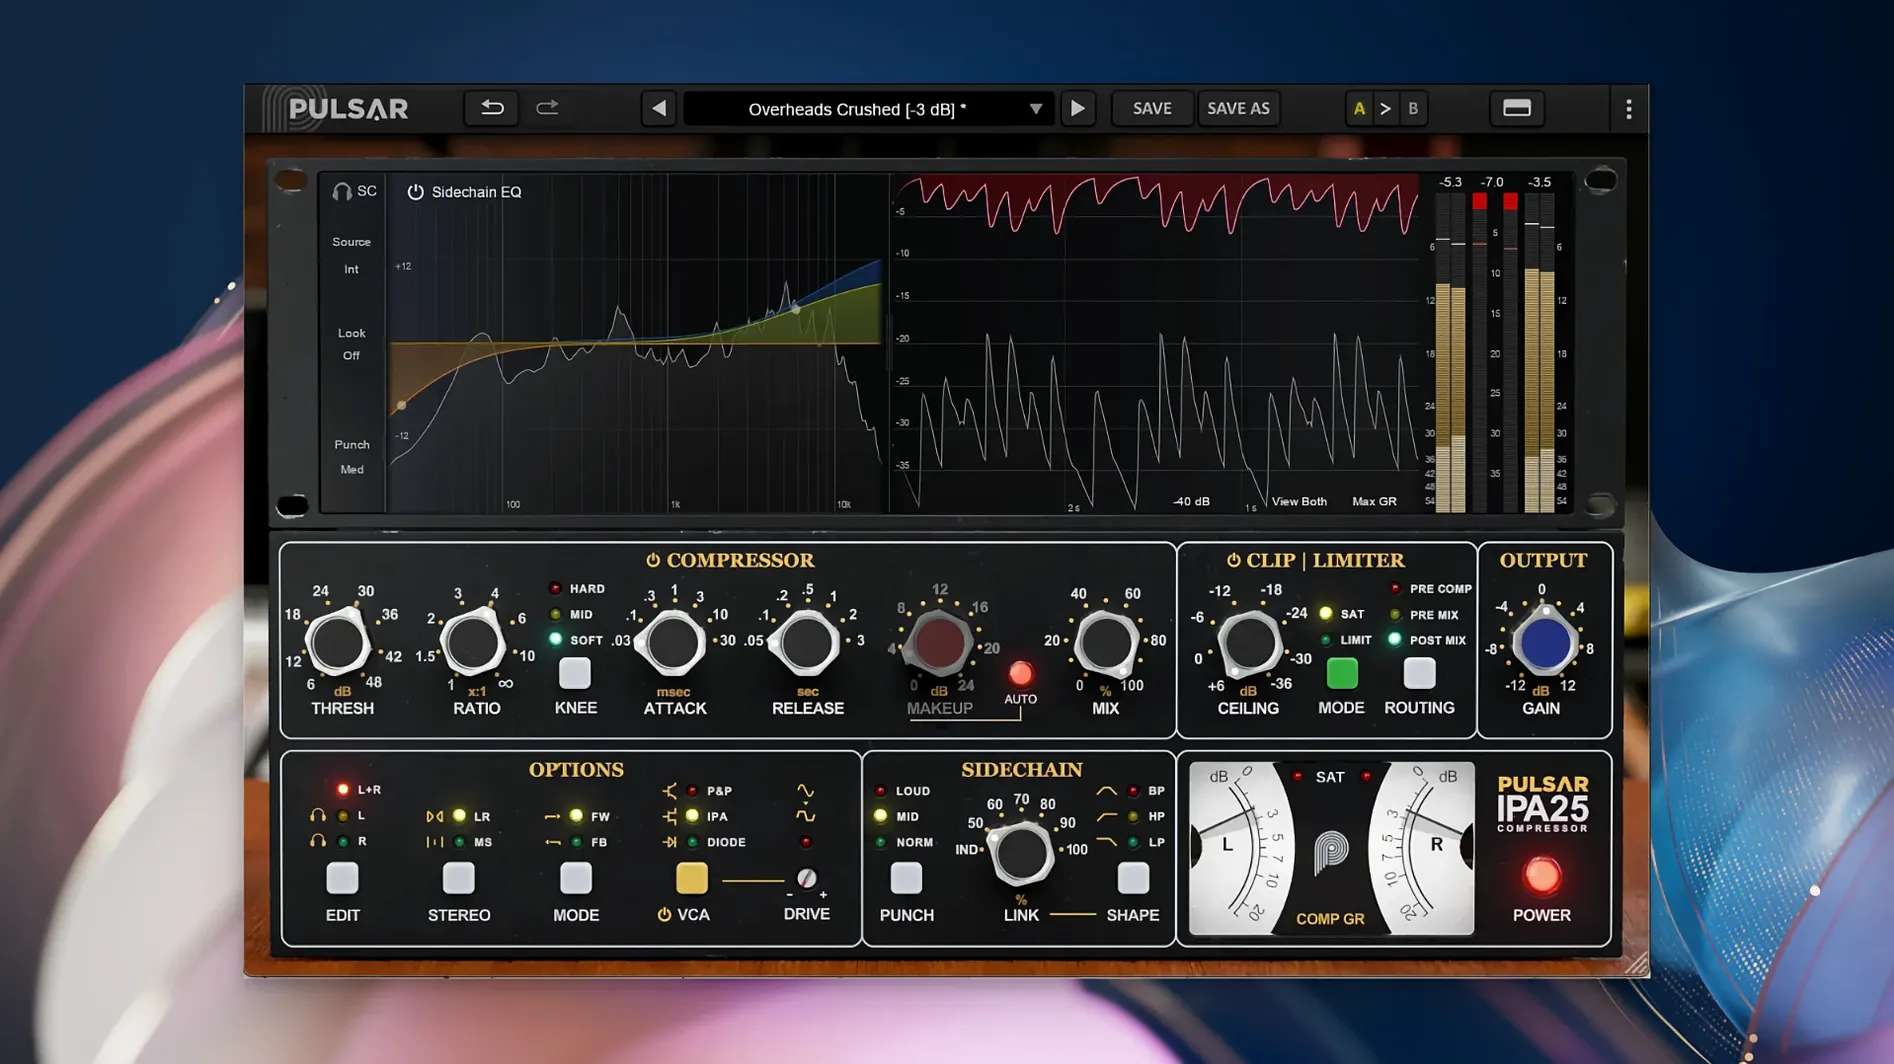
Music producers and sound engineers reaching for a VCA-style compressor often want more than a single flavour. Pulsar Audio IPA supplies three distinct compression behaviours in one unit, paired with a visual sidechain EQ, a clipper and a limiter. The control set is direct but layered, letting you move from gentle bus glue to aggressive sculpting without leaving the plug-in.
- The IPA mode reacts with the punch and grab associated with API 2500-style compression, useful for adding forward motion to drums and mix buses.
- Switching to P&P/Mu softens the knee and slows the release tail, giving program material a smoother, more blended dynamic contour.
- The Diode mode introduces a grittier saturation character and a faster, harder compression curve that suits room mics and parallel crush duties.
- A visual sidechain EQ sits in the detector path, letting you carve exactly which frequencies trigger gain reduction, helpful for controlling low-end energy without choking a full mix.
- Mid/Side processing splits the compressor into two independent channels, so centre-panned elements can be levelled separately from stereo information.
- The output stage houses a clipper and a look-ahead limiter, capturing peaks that escape the VCA section before they reach the DAW fader.
Because each VCA mode re-voices the attack, ratio and threshold behaviour, the same knob positions produce markedly different results. Toggling between them while listening to a drum bus reveals how much the saturation character shifts the tone, even before the gain needle moves. The sidechain EQ’s real-time display removes the guesswork from frequency-dependent compression, making it straightforward to tighten a vocal without dulling the top end or to let kick drums breathe inside a dense arrangement.
High-pass the sidechain at 60 Hz to stop the kick from pumping the mix
The factory default state loads the IPA mode with a medium attack and auto release. Two adjustments make an immediate difference. First, visit the sidechain EQ section and switch the filter from its flat position to a 60 Hz high-pass with a gentle 6 dB/octave slope. This prevents sub-bass energy from dictating gain reduction across the whole mix and keeps the compressor reacting to midrange transients instead. Second, pull the output clipper ceiling down to around -3 dB and engage the look-ahead limiter with a threshold roughly 2 dB above the clipper ceiling. The clipper handles fast transients, the limiter catches any remaining overshoots, and together they give a stable level that requires less chasing later in the chain.
For anyone working with stereo material, enabling Mid/Side mode early — even if you keep both channels identical at first — builds awareness of how the centre and sides respond differently. A common starting point is to set the side channel threshold 2–3 dB higher than the mid channel, which reins in wide elements without flattening the vocal or snare sitting in the middle.
Auto-release on the same dial slows way down when you switch to P&P/Mu
One frequent confusion involves the auto-release behaviour across the three VCA modes. In IPA mode, auto-release tracks the programme closely and recovers quickly. Switch to P&P/Mu and the same auto-release setting behaves far more slowly, which can make a drum bus feel sluggish. The fix is to treat auto-release as mode-dependent: what works in IPA often needs a manual release setting in P&P/Mu, around 200–400 ms as a starting range.
Another snag appears when the clipper and limiter are engaged but the output still peaks above the expected ceiling. This usually happens because the clipper sits before the limiter in the signal path and the limiter’s look-ahead window is very short. If the VCA stage is already reducing gain heavily, the clipper may shave transients that the limiter barely sees. Lowering the clipper threshold slightly and reducing the VCA ratio by half a step often resolves the issue without audible pumping.
Some DAW hosts report the plug-in as unavailable after installation on Apple Silicon machines. The cause is almost always a mismatch between the host’s launch mode and the plug-in format installed. Running the DAW in native ARM mode requires the Audio Unit or VST 3 version compiled for Apple Silicon; launching under Rosetta 2 allows Intel-format plug-ins to appear. Checking the plug-in format in the installer log or the developer’s documentation clears this up quickly.
Users exploring the sidechain EQ for the first time sometimes set a narrow cut and hear no change in compression behaviour. The visual display shows the EQ curve applied to the detector path, not the audio path. If the cut sits outside the frequency range carrying the loudest energy, the compressor never sees it. Broadening the filter Q and watching the gain reduction needle while sweeping the frequency helps locate the active range.
Cycle VCA modes on a snare or bass to map where each one saturates
Spend half an hour with a single source — a snare close mic or a bass line — and cycle through the three VCA modes at matched gain reduction. Note where each mode starts to audibly saturate; the Diode mode saturates earlier and with a harder edge, while P&P/Mu stays cleaner until deeper reduction. This baseline knowledge saves time later when dialling in settings on a full mix.
Build a small set of user presets organised by task rather than source. A preset named “Mix bus – IPA gentle” with 2:1 ratio, 30 ms attack, auto release and the 60 Hz sidechain high-pass becomes a reliable starting point for rock and pop material. Another preset called “Parallel crush – Diode” with 8:1 ratio, fastest attack and the clipper engaged works for blending into drum submixes. Storing these in the DAW’s plug-in preset system means the first day’s experimentation pays off for weeks afterwards.
Test the Mid/Side behaviour on a commercial reference track early on. Solo the side channel in the plug-in’s monitoring section and listen to how the stereo field compresses. This reveals exactly what the sidechain EQ is doing to the wide information and helps calibrate the threshold offset between mid and side channels before applying it to your own material.
Right-click resets threshold to 0 dB in IPA but -6 dB in Diode
Right-clicking any knob resets it to its default value, which differs per VCA mode. The threshold reset point in IPA mode sits at 0 dB, but in Diode mode it lands at -6 dB because the internal calibration shifts. Learning this avoids the surprise of a silent output after a reset.
Holding Shift while adjusting the sidechain EQ frequency locks the gain parameter and vice versa, letting you sweep one control without disturbing the other. This is especially useful when hunting for a resonant kick drum frequency that needs taming in the detector path.
The output clipper’s ceiling knob doubles as a bypass control: double-clicking it toggles the clipper on and off without touching the limiter. This lets you audition the clipped signal in isolation, a quick way to check whether the clipper is adding too much grit before the limiter smooths it over.
The gain reduction meter switches between showing total reduction and per-channel reduction when Mid/Side mode is active. A small arrow icon next to the meter indicates the current view, and clicking it cycles through the options. Many users overlook this and assume the meter always shows summed reduction, missing the chance to see exactly how the side channel behaves during a wide stereo passage.
On smaller laptop screens, the plug-in window can feel cramped. Dragging the lower-right corner scales the interface smoothly, and Pulsar Audio IPA remembers the size per session. Setting it slightly larger than the default during the first session prevents repeated resizing later.