Aspecten
 Download (30 MB)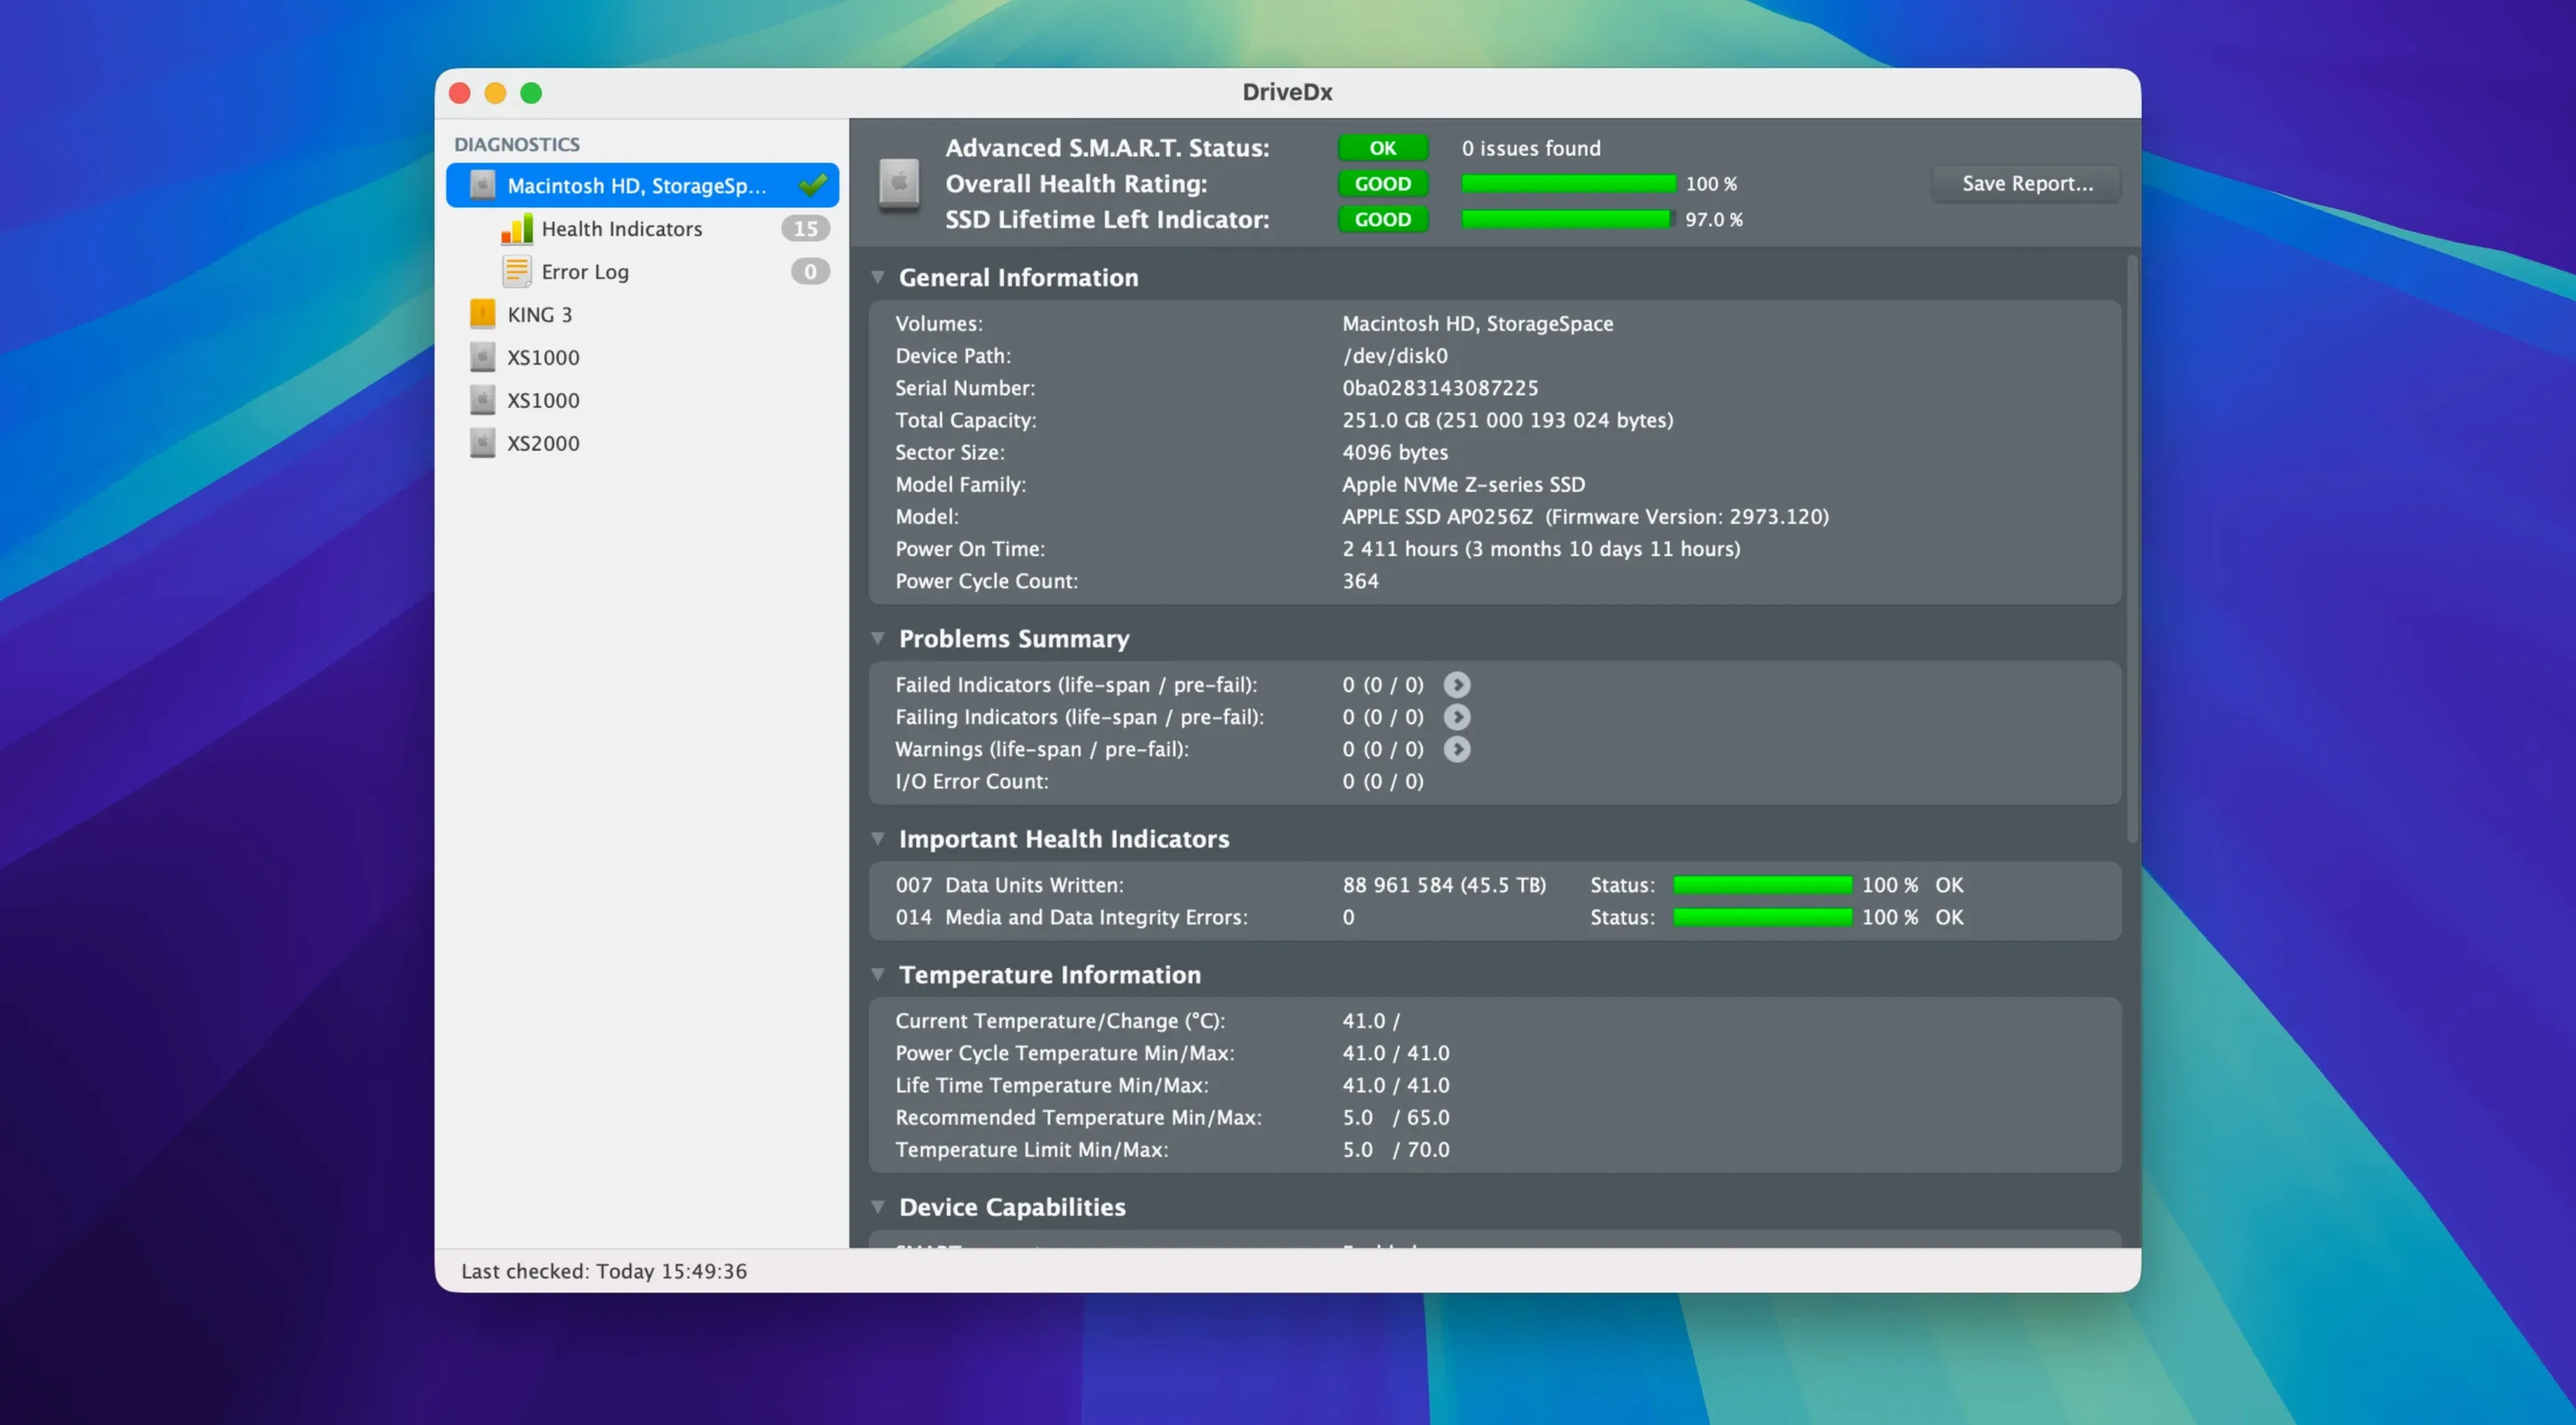
Version 1.12.1 is a maintenance release that quietly tidies up a few edges. The driver installer no longer needs Rosetta 2, the diagnostic heuristics have been refined, and support for Patriot P200 SSDs has been tightened. It is also confirmed ready for macOS Sonoma.
What people tend to ask before installing
- Does it actually predict a failing drive? DriveDx uses heuristic algorithms that weigh multiple SMART indicators — reallocated sectors, pending bad sectors, I/O errors and SSD wear — to flag drives that are degrading before they stop working outright. It is not infallible, but it catches patterns a basic SMART pass/fail check ignores.
- Will it run on an Apple Silicon Mac? Yes. The utility is a universal binary and the current driver installer runs natively without Rosetta 2. It supports Intel and Apple Silicon Macs back to OS X 10.9 Mavericks.
Continuous background SMART tracking and threshold alerts
DriveDx sits in the background and reads the drive’s SMART data continuously. It tracks SSD wear levelling, drive performance trends and raw error counts. When a threshold is crossed or a heuristic model flags a risk, it can push a notification. The interface is functional rather than polished — tables, gauges, plain-English health summaries — but it presents the raw data without hiding the details that matter for troubleshooting.
Let DriveDx learn your drive for a day or two first
Give it a day or two of normal work before drawing any conclusions. DriveDx needs a fresh baseline of drive behaviour to refine its health estimates. A drive that looks marginal right after a clean install may settle into a stable picture by the end of the week.
- Open System Settings, go to Notifications, find DriveDx and switch the alert style to Alerts. The default banner is easy to miss, and a persistent alert is what you want for a drive that tips into Warning or Failing.
- Enable Launch at Login from the DriveDx menu bar icon. Background monitoring only works if the app is actually running. There is no separate daemon — the main app must be open.
- Check the Drive Health Indicators tab on day one and export a full report with File > Save Diagnostic Report. Keep it somewhere safe. Having a snapshot of a healthy drive makes it far easier to spot which values have shifted weeks later when you hear a suspicious click.
- If your Mac has multiple drives — an internal SSD and an external Time Machine disk, say — click each one in the sidebar and then pick Drive > Add to Favourites. The temperature and health summary in the menu bar shows only the first drive by default; favourites push a second drive front and centre.
Right-click any sidebar drive for instant self-tests and exports
DriveDx is light on flashy features, but it packs a handful of quiet time-savers that never announce themselves.
- Right-click any drive in the sidebar to jump directly to its self-test options, export menu or the detailed SMART attributes view. It saves the three-click route through the top menu when you are quickly checking a drive pulled from an old enclosure.
- The magnifying glass icon in the toolbar opens a search filter that matches across all SMART attribute names and descriptions. Type
wearand it isolates the SSD wear-levelling count and any relevant thresholds, instantly reducing a 40-attribute table to the two lines you care about. - Holding Option while clicking the menu bar icon skips the popover and opens the full main window. Useful when the icon already shows a yellow Warning indicator and you want to dig straight into the data without an extra click.
- The Copy button inside any SMART attributes view copies the whole attribute list to the clipboard as tab-separated text. Pasting it into a plain text editor, a spreadsheet or a support ticket preserves the layout.
- DriveDx updates its health heuristics through point releases rather than silently in the background, so the version number in the About window is also the version of the diagnostic model you are running. Something to know before comparing reports with someone on a different build who uses a DriveDx Mac crack — older cracked builds often carry outdated heuristics that may need a manual database refresh to read modern SSDs correctly.
Tailor health change notifications after the baseline settles
Right after giving it a day of baseline monitoring, a few preference tweaks make the tool fit tighter into daily use without nagging.
Health change notifications. Version 1.12.1 adjusted the notification thresholds, but you may want to tailor them further. In Preferences > Notifications, increase the minimum notification interval to at least four hours. The raw drive-health change event can fire several times in quick succession, which turns a useful early warning into noise.
Temperature units. The default is Celsius. Switch to Fahrenheit in Preferences > General if that matches your mental model. The menu bar can display the temperature for the first or favourite drive, and the unit change applies everywhere except the raw SMART attribute table, which always reports in Celsius as the ATA spec intends.
Email alerts (SMTP). In Preferences > Email Reports you can point DriveDx at an SMTP server to have it send a diagnostic report when health drops below a threshold. It is a bit old-fashioned, but it works for headless Mac minis or machines you only touch once a month. Tick Send detailed report — the short version omits the attribute table, which is the only part a repair shop might actually read.
Driver toggle. Under DriveDx > Install Driver, you will see whether the SAT SMART driver is loaded. The 1.12.1 installer handles Apple Silicon without Rosetta 2, but you still need to tick the option and authorise the kernel extension manually the first time. Until the driver is active, external drives connected via USB may show only a partial SMART attribute set. Check this if an external enclosure reports “No Data” for several rows that should be populated. A DriveDx torrent or repackaged build sometimes bundles an older driver that needs a manual re-signing step to load on Sonoma; the official one sorts it cleanly.
A full diagnostic workflow for a noisy external drive
Suppose an external USB hard drive has started making a faint rhythmic tick and you want to know whether it is safe to keep using it for daily backups. Here is a repeatable path through DriveDx.
- Plug the drive in and let it spin up. Open DriveDx and verify the SAT driver is loaded — the sidebar shows the drive model and serial number, not just a generic bridge chip identifier.
- Click the drive in the sidebar. The summary panel shows the calculated health status. If it reads anything other than OK (100%), note the indicator description underneath — it will say something like “Reallocated sector count is high” and explain which value drove the downgrade.
- Switch to the SMART Attributes tab. Sort by Worst to bring the most stressed attributes to the top. Look at Reallocated Sector Count, Current Pending Sector Count and Uncorrectable Sector Count in the same glance. A handful of reallocated sectors on an old spinning disk is normal; pending sectors that do not reallocate and climb week over week is the red flag.
- Still in the attributes tab, note the Raw Value column for Spin Retry Count and Reported Uncorrectable Errors. Any non-zero value there, combined with the ticking sound, means the drive is already struggling with physical reads.
- Before running a self-test, click File > Save Diagnostic Report so you have a timestamped snapshot. Now choose Drive > Run Short Self-Test. On a spinning disk this takes two to five minutes. DriveDx will show the progress and then the result directly beneath the test button.
- If the short test passes but you are still suspicious, run the Extended Self-Test. It reads every sector and may take several hours on a large drive. During the test the drive is still mountable but best left idle.
- Check the test result. A “Completed without error” means the drive’s internal diagnostics saw no sector-level failures during the scan. A “Completed with read failure” with an LBA address tells you exactly which sector failed, and that is the point when you stop trusting the drive for anything except a final copy of salvageable files.
- Export the final report and include the self-test result. If you are sending it to someone else, mention whether the drive was tested with a DriveDx torrent build — some older cracked versions have known quirks where extended test results need a specific export format to display correctly on APFS volumes.
Driver installation and authorisation for external drive data
“No data” for external drives. This is almost always the SAT driver not being installed or not authorised. Go to DriveDx > Install Driver, follow the prompt, then check System Settings > Privacy & Security — the extension may be waiting for explicit approval there. Restart DriveDx afterwards. If the drive is behind a Thunderbolt hub with USB ports, try connecting it directly first, because some hub chipsets strip SMART passthrough.
SSD health drops sharply but the drive feels fine. SSDs wear in two dimensions: total bytes written and NAND cell degradation. DriveDx weights both. The SSD Lifetime Left indicator can dip quickly in the last 10% of its usable life because wear levelling can no longer smooth out weak blocks. Check the Media Wearout Indicator raw value — if it has been climbing linearly and then accelerated, the trend is real. A DriveDx Mac crack locked to an older version may need a raw value offset adjustment to report accurately on newer 3D NAND SSDs, so verify the version number.
Performance graph stays flat or missing. The real-time I/O graph in the drive overview tab requires the driver and full SMART access. If the driver is installed but the graph is missing, the drive may not support the specific performance counters. Some external SSD controllers report health but not latency stats. There is no workaround for that — it is a hardware limitation, not a DriveDx fault.
Notifications appear but the drive still shows OK. The notification threshold fires on a relative change in the health score, not only on crossing into Warning territory. A drive can slide from 100% to 96% overnight and trigger a notification even though the status stays green. That is intentional — it is telling you a value moved. Open the notification or the main window, see which attribute shifted, and decide if it is normal wear or an early signal. Adjust the sensitivity slider