Aspecten
 Download (65 MB)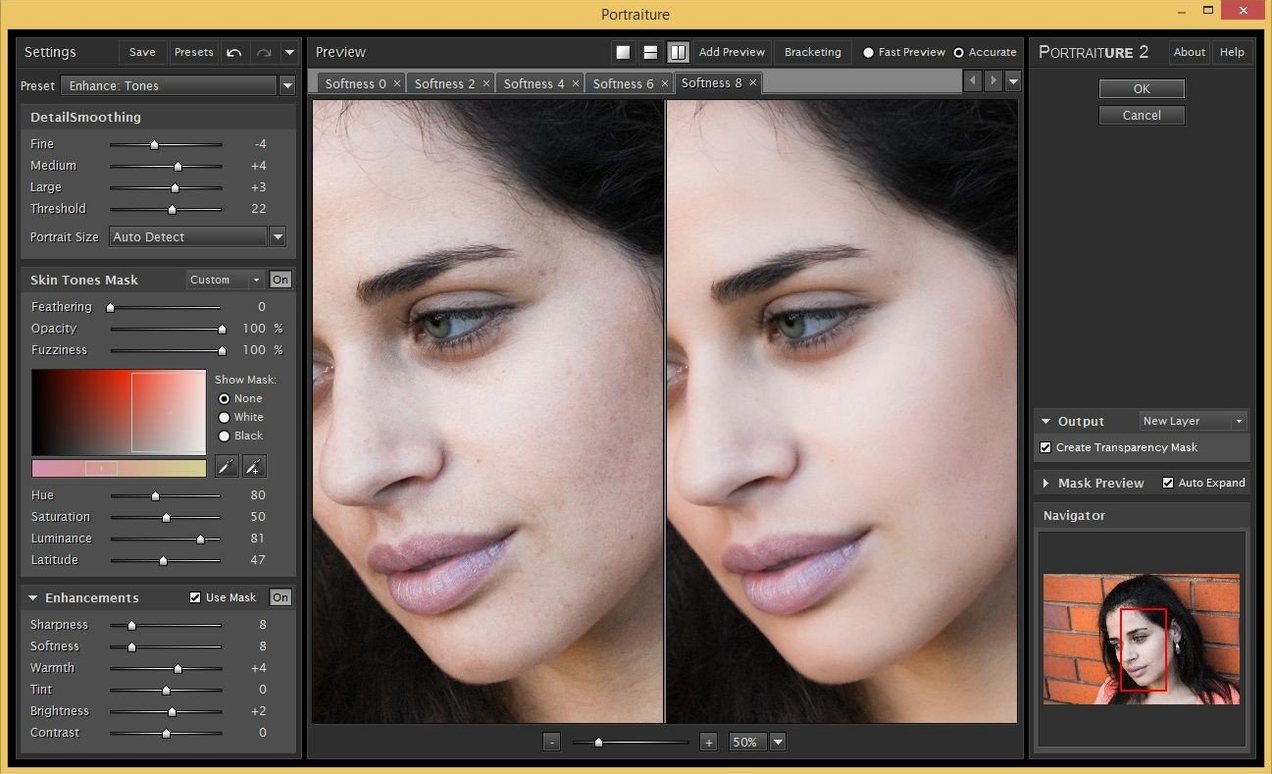
Portrait and wedding photographers who regularly work through large batches of images are the most likely audience for this plugin. It handles skin smoothing inside Photoshop, Lightroom Classic, and Affinity, replacing the slow cycle of frequency separation layers and manual masking with a single automated pass.
The core of the tool is its AI smoothing engine, which analyses the image and isolates skin areas without affecting eyes, hair, or background detail. What you control is the character of that smoothing. A set of sliders governs the texture: fineness dictates the scale of detail preserved, while strength sets how much the surface is evened out. A separate masking panel gives you a real-time mask preview, so you can check exactly where the effect lands and adjust it before committing the result to a new layer.
Because it works non-destructively, you can fine-tune the opacity of the retouched layer in Photoshop after the fact. The plugin also includes a handful of preset styles ranging from subtle to editorial, each of which you can modify further. The immediate feedback in the preview window means you spend less time toggling before-and-after views to verify the edit.
Performance is straightforward on modern Mac hardware. The current build runs natively on both Apple Silicon and Intel systems, and the plugin slot neatly into the filter menu in Photoshop or the external editing workflow in Lightroom Classic. It is not a standalone application; you need one of the supported hosts to run it.
A retouching workflow, start to finish
Consider a typical batch of fifty headshots from a corporate session, all shot under the same lighting. Opening each file and hand-painting a mask is not practical. The plugin turns this into a repeatable, three-step routine.
Step one happens in Lightroom Classic. Apply global adjustments — exposure, white balance, contrast — to one representative image, then synchronise those settings across the batch. Select the first file and send it to the plugin via Photo > Edit In > Imagenomic Portraiture. The dialogue opens with a default preset and an auto-generated mask already in place.
Step two is where your judgement comes in. Zoom the preview to 100% on the cheek area. The masking panel shows, in white, exactly which pixels will receive smoothing. Drag the Threshold slider a few points to the right if the mask is bleeding into the eyebrows; drag Feathering up slightly to soften the transition along the jawline. Now adjust the smoothing: set Fineness to a medium value around +10 and Strength to roughly −6 for a natural result on Caucasian skin under soft light. Switch the preview to a split view and compare the left (original) against the right (smoothed). If pores remain too pronounced, nudge Fineness lower. If the skin looks plastic, back off Strength.
Step three saves time across the remaining forty-nine images. Once you are satisfied, save the settings as a new preset named after the job — Q1-2025-Corp-Headshots, for instance. Click OK to apply the effect and return to Lightroom, where the retouched file appears as a new TIFF stacked with the original raw. For the next image, invoke the plugin again, select your preset from the dropdown, confirm the mask still reads correctly, and click OK. Most frames will need no further tweak beyond a glance at the mask overlay. The whole batch completes in under twenty minutes.
In Photoshop the workflow is similar but the output lands on a duplicate layer. Keep that layer at full opacity for now, then add a black layer mask and paint the smoothing back in with a soft white brush only where it is needed — under the eyes, across the forehead, along the nasolabial folds. This selective application is what separates an edit that looks retouched from one that looks unnatural.
When auto-masking mistakes a collar for skin
The most common error is leaving the mask panel untouched and trusting the auto-detection to get everything right. It does a respectable job, but it can misread pale clothing, hands placed near the face, or catchlights in the eyes as skin. The result is a subtle blurring of details that should stay sharp. Always inspect the mask overlay at 100% before you commit the effect. The Tonal Range control inside the masking panel helps exclude highlights and deep shadows, which keeps shirt collars and hair edges crisp.
Another frequent misstep is going too heavy on Strength right away. The slider runs from −15 to +15, and values beyond +5 on a close-up portrait can erase the micro-contrast that gives skin its texture. Beginners often dial in what looks acceptable in the small preview pane, only to open the full-resolution file later and find a wax-figure result. A safer habit is to set Strength at −3 or −4 and push the Fineness slider a touch negative instead. This keeps some grain structure intact while evening out colour transitions.
Applying the plugin globally to a full-body portrait or an environmental shot is a third trap. The engine looks for skin-like tones across the entire frame, so bare arms, hands, or even warm-toned backgrounds can catch the smoothing unintentionally. The fix is straightforward: paint a quick mask in Photoshop before launching the plugin, or use Lightroom's adjustment brush to define a rough selection and then invoke the plugin only on that area. The mask inside Portraiture will still refine the skin boundaries within your selected region.
Neglecting the output layer's opacity is a subtler mistake. The plugin returns the effect at 100%, but real skin is never perfectly smooth. Dropping the layer to 70–85% opacity lets the original texture show through just enough to keep the portrait believable. This single adjustment often rescues an overdone edit.
Feathering the mask edge to 6–8 pixels first
The out-of-the-box defaults are tuned for a moderate, all-purpose smoothing, but a few adjustments make the plugin feel calibrated to your own hand.
Mask defaults. Open the masking panel and set Feathering to 6–8 pixels as your starting point. The default of 3 can produce a visible edge where smoothed skin meets untreated areas, particularly on high-resolution sensors. Increase Opacity inside the mask panel to 100% so you see the full masked area in white; the semi-transparent default can hide faint mask spill.
Preview mode. Switch from the side-by-side vertical split to the horizontal split, or to the single-image toggle. The vertical divider often cuts through the nose or an eye, making comparisons awkward. A horizontal split places the forehead and eyes in the upper half and the mouth and chin in the lower half, which is easier to read at a glance.
Enhancements section. The Warmth and Brightness sliders sit below the smoothing controls and are easy to overlook. A slight warmth boost of +3 to +5 corrects the slight desaturation that aggressive smoothing can introduce, while a brightness adjustment of +2 lifts the midtones of the skin without altering the overall exposure. These small touches keep the portrait from looking flat.
Preset building. Rather than overwriting the default preset, create one preset per lighting condition you encounter regularly: window light, studio strobes, overcast outdoor, tungsten. Save each with a descriptive name. The time you invest in building these presets pays back on every subsequent session, because the mask behaviour and smoothing character that work for a given light rarely need reinventing.
Delivering hundreds of edited frames without repetitive brushing
Volume portrait photographers — school photographers, headshot specialists, event photographers delivering hundreds of frames per job — see the clearest benefit. The plugin eliminates the repetitive masking that would otherwise consume hours in Photoshop actions or Lightroom brush work. When you are editing for consistency across an entire gallery rather than for a single hero image, the ability to save and recall presets turns retouching into a near-mechanical step that takes seconds per frame.
Wedding and family photographers occupy a similar niche. They handle mixed skin tones in varying light, often within the same set, and the tonal-range masking helps them treat different complexions without constantly re-painting selections. The non-destructive output means they can deliver a lightly retouched full gallery and then, for the album selects, drop the smoothing layer's opacity selectively for a more polished finish.
Photoshop users who are comfortable with layers but dislike frequency separation will also gravitate toward the plugin. It does not replace advanced retouching — dodge and burn, healing brush work on blemishes, and colour grading still belong in your main editing flow — but it handles the broad-strokes skin evening that frequency separation otherwise addresses. Used as the first pass before detail work, it shortens the retouching pipeline.
Mac users on Apple Silicon machines benefit from the native ARM build, which keeps the preview rendering responsive even on large TIFFs from high-megapixel bodies. The plugin does not demand a dedicated GPU or a specific amount of unified memory beyond what the host application already requires. Users of Intel Macs running macOS 13 or later can expect the same functional experience, though the mask preview may refresh a beat slower on older hardware.
Smoothing texture across a mask versus removing individual spots
Portraiture versus Retouch4me Heal. Retouch4me Heal is a standalone application and plugin that targets blemishes, spots, and small irregularities rather than overall skin smoothing. Where Portraiture evens out texture across a masked area in one pass, Heal identifies and removes individual imperfections one by one. The two tools complement each other more than they compete: a retoucher might run Heal first to clean up specific marks, then apply Portraiture for surface-level smoothing. Heal works as a Photoshop plugin, and its AI draws on a different training set, one focused on dermatological-level defect detection rather than broad skin-texture analysis. Users looking solely for a spot-removal tool will find Heal more targeted; those wanting to soften texture across a whole face without manual brushing will lean toward Portraiture.
Portraiture versus Luminar Neo's Portrait tools. Skylum's Luminar Neo includes a dedicated Portrait module with skin smoothing, face shaping, and eye enhancement sliders. It operates as a standalone editor or a Lightroom plugin, not as a Photoshop filter. The skin-smoothing portion uses AI face detection rather than a tonal mask, so it identifies faces and applies corrections only within detected facial boundaries. That approach works well for casual editing but offers less fine control over masks than Portraiture's panel. Luminar Neo also bundles its retouching among many other editing tools, whereas Portraiture does one thing within the host you already use. For a photographer who already owns and prefers a Photoshop- or Lightroom-centric workflow, adding Portraiture keeps the process linear. Someone starting from scratch, without an Adobe subscription, might find Neo's all-in-one approach more practical.
Portraiture versus Frequency Separation actions. Many retouchers build their own frequency separation setups using Photoshop actions and layer stacks. The method splits an image into a low-frequency colour layer and a high-frequency texture layer, allowing independent smoothing and healing. It is powerful, free beyond the time investment, and endlessly customisable. Portraiture approximates a similar outcome in a fraction of the steps. The trade-off is granularity: a manual frequency separation gives you full control over every brush stroke on the texture layer, while Portraiture makes global or masked adjustments via sliders. For precision work on a single hero portrait — an editorial beauty shot, say — many retouchers still prefer the manual route. For consistency across dozens of images, the plugin's speed outweighs the loss of per-pixel control.